How to Make Consistent AI Characters Across Multiple Images (Step-by-Step)
Written by
Jay Kim
Learn how to generate the same AI character across multiple images with consistent features, clothing, and style using reference sheets, prompt structures, and inpainting workflows.
Character consistency is the single biggest frustration in AI image generation. You create a perfect character in one image, and the moment you try to generate a second image with the same character, everything changes. The face shifts. The clothing looks different. The proportions feel off. The hairstyle morphs into something unrecognizable.
This is not a niche problem. It affects everyone creating AI content that relies on recurring characters, whether you are building a brand mascot, illustrating a children's book, producing YouTube thumbnails with a consistent persona, or designing a visual story across multiple scenes.
The good news is that character consistency in AI images has improved dramatically in 2026. The tools are better, the techniques are more reliable, and there are proven workflows that give you repeatable results without fighting the model every time.
This guide breaks down the exact step-by-step process for generating consistent AI characters across multiple images. You will learn why consistency breaks, what prompt structures keep it intact, and how to build a character system that works every time you generate.
Why Character Consistency Matters More Than Most Creators Think
If you are posting AI-generated content on YouTube, Instagram, TikTok, or a blog, your audience builds visual memory around recurring characters. When a character looks different in every frame, it creates a subtle feeling of disconnection. Viewers might not consciously notice, but their brain registers that something feels off.
This matters even more when you are creating content at scale. Faceless YouTube channels that rely on illustrated characters need the same protagonist across dozens or hundreds of Shorts. Brand accounts using AI mascots need that mascot to be instantly recognizable. Educators creating visual explainers need consistent figures so learners can follow the story without confusion.
Consistency is what turns a random AI image into a character people remember.
For creators producing AI Shorts formats that go viral, having a recognizable recurring character is one of the strongest retention signals you can build into your content. It gives viewers a reason to come back.
Why AI Image Models Struggle With Consistency
Before diving into solutions, it helps to understand why this problem exists.
Most AI image models generate each image independently. When you type a prompt, the model interprets it from scratch every time. Even if you use the exact same words, the model introduces variation because it samples from a probability distribution. Small differences in how the model interprets "brown hair" or "blue jacket" accumulate, and the result is a character that looks slightly (or drastically) different each time.
This is not a bug. It is how generative models work. They are designed to produce variety. Consistency is something you have to engineer on top of that natural variation.
The three main reasons consistency breaks down are prompt ambiguity, missing visual anchors, and lack of reference images. If you address all three, your consistency improves dramatically.
The Character Sheet Method
The most reliable technique for maintaining character consistency is creating a character reference sheet before generating any scene images. Think of this like what animation studios do before producing a single frame. They design the character from multiple angles first, then use that reference for every scene.
Here is how to do this with AI image generation.
Step 1: Define Your Character in Writing
Before you generate anything, write a detailed character description that covers every visual element you want to stay consistent. This description becomes your "character DNA" that you paste into every prompt going forward.
Your character description should include the subject's apparent age and gender, skin tone, hair color and style, eye color, facial features like jawline shape or freckles, body type and height impression, default clothing, and any distinguishing accessories or marks.
The more specific you are, the less room the model has to improvise.
Example Character Description:
A woman in her late 20s with warm brown skin, long black wavy hair past her shoulders, dark brown eyes, a soft oval face with high cheekbones, wearing a fitted olive green utility jacket over a white t-shirt, dark blue jeans, and white sneakers. She has a small silver hoop in her left ear and a thin silver necklace.
This description should be saved somewhere you can copy and paste it into every prompt. Treat it like a reusable block.
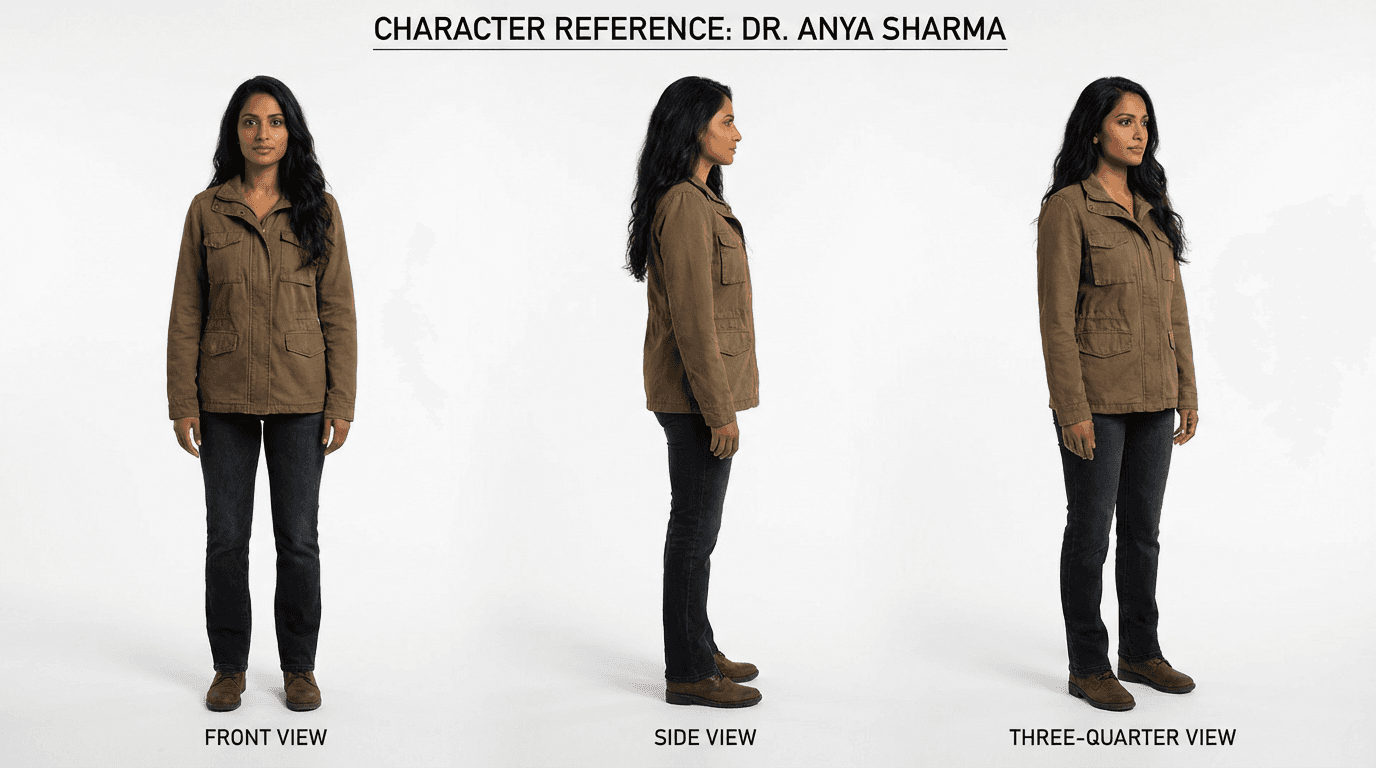
Step 2: Generate a Character Reference Sheet
Use your character description to generate a reference sheet that shows the character from multiple angles. This gives you (and optionally the model) a visual anchor to compare against.
Prompt:
Character reference sheet showing a woman in her late 20s with warm brown skin, long black wavy hair past her shoulders, dark brown eyes, soft oval face with high cheekbones, wearing a fitted olive green utility jacket over a white t-shirt, dark blue jeans, and white sneakers, small silver hoop in left ear, thin silver necklace. Show front view, three-quarter view, side view, and back view on a clean white background, professional character design sheet, consistent proportions across all views, soft studio lighting, photorealistic
This gives you a single image with multiple angles of the same character. Save this image. It becomes your master reference.
Step 3: Use the Reference Image for Every New Generation
This is where the real consistency happens. Instead of relying only on text prompts, upload your character reference sheet as a reference image every time you generate a new scene.
Most advanced AI image tools now support image-to-image generation or reference image uploads. When you provide both a text description and a visual reference, the model has two sources of truth to work from, which significantly reduces variation.
Inside Miraflow AI's image generator, you can upload up to 8 reference images alongside your text prompt. This means you can include your character sheet and still have room for additional references like background images or style examples.
Step 4: Lock Your Prompt Structure
Every time you generate a new image of your character, use the same prompt structure. The character description block should remain identical. Only change the scene, action, and environment details.
Template:
[Exact character description block], [action the character is performing], [environment and setting], [camera angle and framing], [lighting], [style and mood]
Example using the template:
A woman in her late 20s with warm brown skin, long black wavy hair past her shoulders, dark brown eyes, soft oval face with high cheekbones, wearing a fitted olive green utility jacket over a white t-shirt, dark blue jeans, and white sneakers, small silver hoop in left ear, thin silver necklace. She is walking through a rainy city street at night holding an umbrella. Neon signs reflect on wet pavement. Medium shot from slightly below eye level. Soft rim lighting from neon signs, cinematic color grading, photorealistic, shallow depth of field.
Notice how the character block stays exactly the same. This is critical. If you rephrase the description, even slightly, you introduce drift.
The Keyword Anchoring Technique
Beyond reference images and consistent descriptions, there are specific keywords that help anchor consistency across generations.
Certain terms act as stabilizers because they constrain what the model can vary. Adding these to your prompts reduces the randomness in how the model renders your character.
High-consistency keywords to include:
- "same character as reference"
- "consistent facial features"
- "matching outfit and accessories"
- "identical hairstyle"
- "preserve character identity"
- "character continuity"
You do not need to use all of these every time. Pick two or three that are most relevant to what keeps drifting in your outputs.
If you have worked with Nano Banana prompts before, you already know that the model responds well to visual instructions rather than emotional ones. The same principle applies here. Tell the model what the camera sees, not what you want to feel.
Common Mistakes That Break Character Consistency
Understanding what breaks consistency is just as important as knowing what preserves it. These are the most frequent errors creators make.
Rewriting the character description between prompts
Even small rewrites cause drift. If one prompt says "wavy dark hair" and the next says "black curly hair," the model treats these as different characters. Copy and paste the exact same description every time. Do not paraphrase.
Changing the art style between images
If one image uses "photorealistic" and the next uses "anime style," the character will look fundamentally different regardless of how detailed your description is. Lock your style keyword and keep it consistent.
Using vague physical descriptions
Descriptions like "a young woman" or "a handsome man" give the model almost no constraints. The more specific you are about facial structure, hair, clothing, and accessories, the more consistent the output becomes.
Forgetting to upload the reference image
Text alone is not enough for high consistency. If your tool supports reference image uploads, use them every single time. The visual reference is what anchors the model's interpretation of your text.
Overloading the prompt with scene details
When you pack too many environmental details into the prompt, the model sometimes deprioritizes the character description to make room for the scene. Keep your scene description focused. Let the character block take up the most space in the prompt.
Building a Character Prompt Library
Once you have a character that works, build a small library of pre-written prompts for common scenarios. This saves time and keeps your output consistent because you are reusing tested prompts rather than writing new ones from scratch.

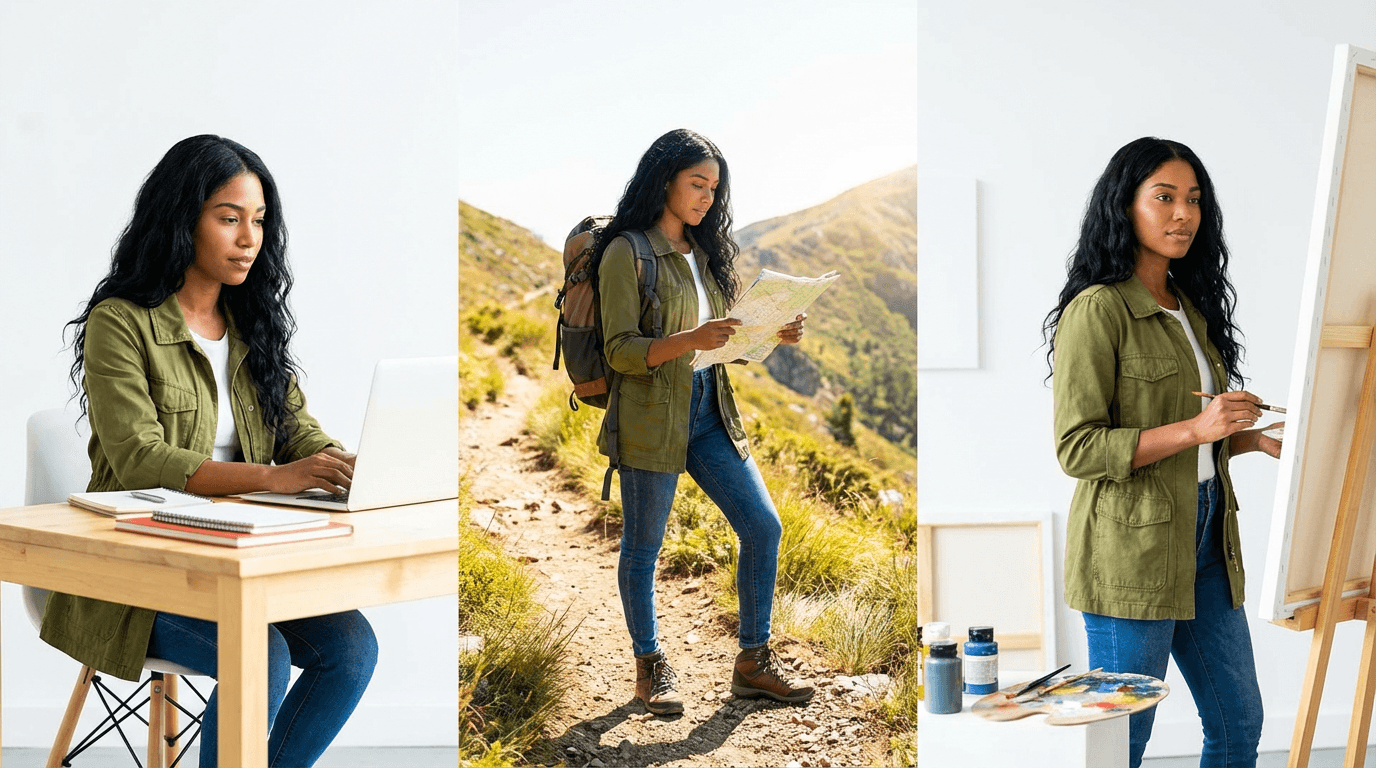
Here are example prompts for a single character across different scenes. All of them use the same character description block.
Character at a desk working
Prompt:
A woman in her late 20s with warm brown skin, long black wavy hair past her shoulders, dark brown eyes, soft oval face with high cheekbones, wearing a fitted olive green utility jacket over a white t-shirt. She is sitting at a modern wooden desk typing on a laptop, soft natural light from a large window to her left, cozy home office with plants in the background, medium shot, clean composition, photorealistic, warm color tones
Character outdoors in nature
Prompt:
A woman in her late 20s with warm brown skin, long black wavy hair past her shoulders, dark brown eyes, soft oval face with high cheekbones, wearing a fitted olive green utility jacket over a white t-shirt, dark blue jeans, and white sneakers, small silver hoop in left ear. She is standing on a hiking trail looking out at a mountain valley at golden hour, wide shot, soft golden light, cinematic color grading, photorealistic, natural environment, shallow depth of field
Character in a studio recording
Prompt:
A woman in her late 20s with warm brown skin, long black wavy hair past her shoulders, dark brown eyes, soft oval face with high cheekbones, wearing a fitted olive green utility jacket over a white t-shirt, thin silver necklace. She is standing in front of a podcast microphone in a small studio, soft warm lighting, sound foam panels on walls, close-up shot from chest up, photorealistic, calm and focused expression, professional atmosphere
Character as a YouTube thumbnail subject
Prompt:
A woman in her late 20s with warm brown skin, long black wavy hair past her shoulders, dark brown eyes, soft oval face with high cheekbones, wearing a fitted olive green utility jacket over a white t-shirt, surprised and excited expression, bright colorful background with soft bokeh, face takes up 40 percent of frame, high contrast lighting, YouTube thumbnail style, vibrant and eye-catching, photorealistic
This last prompt is especially useful if you are creating consistent YouTube thumbnail styles with AI. Having a character prompt ready for thumbnail generation means every video on your channel features the same recognizable face, which directly improves brand recognition and click-through rate.
How to Handle Clothing Changes While Keeping the Character
Sometimes you need your character in a different outfit. A winter scene requires a coat. A formal event requires a dress. The challenge is changing clothes without changing the character's face and features.
The solution is to keep the facial and physical description identical and only swap the clothing section.
Base character (face and body):
A woman in her late 20s with warm brown skin, long black wavy hair past her shoulders, dark brown eyes, soft oval face with high cheekbones, small silver hoop in left ear, thin silver necklace
Outfit variation 1 (formal):
wearing an elegant black evening dress with subtle gold embroidery, black heels
Outfit variation 2 (winter casual):
wearing a long camel-colored wool coat over a dark turtleneck, black boots, knitted beige scarf
Outfit variation 3 (athletic):
wearing a fitted navy blue running jacket, black leggings, white running shoes
Combine the base character block with any outfit variation, then add the scene and camera details as usual. This modular approach keeps the character locked while giving you wardrobe flexibility.
Using Inpainting for Targeted Fixes
Even with perfect prompts and reference images, you will sometimes get a generation where the face is right but one detail is wrong. Maybe the jacket color shifted, or an accessory is missing, or the background bled into the character's outfit.
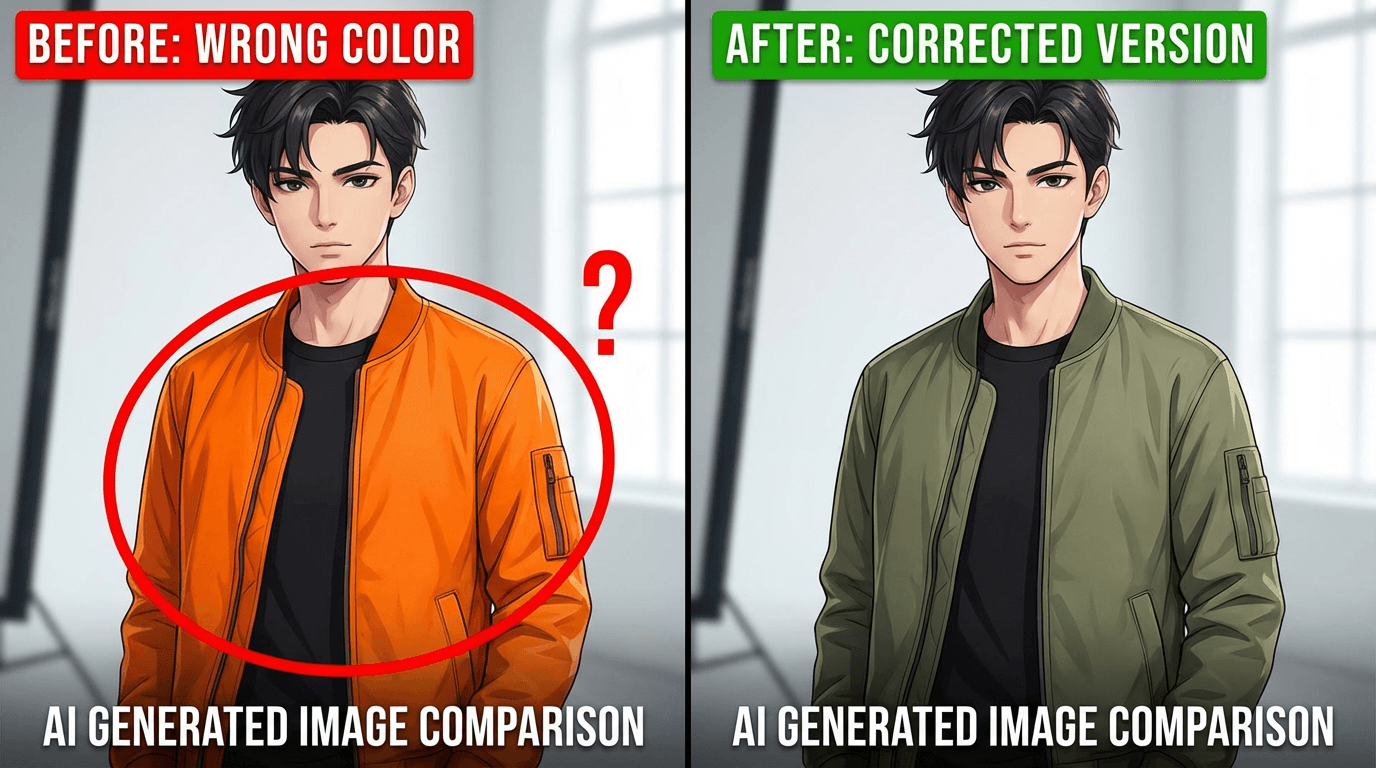
Instead of regenerating the entire image and risking a different face, use inpainting. Inpainting lets you mask a specific area of the image and regenerate only that section while keeping everything else intact.
This is one of the most underused techniques for character consistency. If 90 percent of the image is correct, there is no reason to throw it away. Fix the 10 percent that drifted.
Inside Miraflow AI, the image inpainting tool lets you paint a mask over the area you want to change, type a prompt for what should replace it, and generate. The rest of the image stays untouched. This is how you fix a wrong jacket color, add a missing earring, or correct a hairstyle without losing the facial consistency you already achieved.
Character Consistency Across Video Content
If you are creating video content with recurring characters, the same principles apply but the workflow is slightly different.
For AI-generated video using tools like Veo3 or Veo3.1, character consistency depends on repeating the exact same character description in every video prompt. The Veo3 prompt writing guide specifically notes that for multi-clip sequences, you need to duplicate the character, clothing, and lighting details across every prompt. The model does not remember what it generated before. You have to tell it again every single time.
For Text2Shorts, you can describe your character in the initial topic and the system will maintain that character across the generated segments. Since Text2Shorts handles the scene decomposition automatically, it naturally keeps visual elements more consistent within a single video than manually generating separate clips would.
When you need a character to appear across multiple separate Shorts or Reels, save the character description and paste it into each new Text2Shorts topic. This is the same copy-paste approach described earlier for images, adapted for video workflows.
Creating Multiple Consistent Characters in the Same Scene
Things get harder when you need two or more consistent characters in the same image. The model can easily confuse which description belongs to which character, especially if they have similar features.
The solution is positional labeling. Instead of listing two descriptions back to back, assign spatial positions to each character.

Example with two characters:
On the left side of the frame, a tall man in his early 30s with short dark brown hair, light skin, clean-shaven, wearing a navy blue blazer over a gray crew-neck t-shirt. On the right side of the frame, a woman in her late 20s with warm brown skin, long black wavy hair past her shoulders, dark brown eyes, wearing a fitted olive green utility jacket over a white t-shirt. They are standing together in a modern coffee shop, both holding coffee cups, medium shot, soft natural light from large windows, photorealistic, warm tones, shallow depth of field.
Positional cues like "on the left" and "on the right" help the model assign the correct attributes to the correct character. Without these cues, features tend to blend between subjects.
Advanced Tip: Building a Visual Style Guide
Professional creators and brands take this one step further by creating a full visual style guide for their AI characters. This is not complicated, but it pays off significantly when you are producing content at volume.
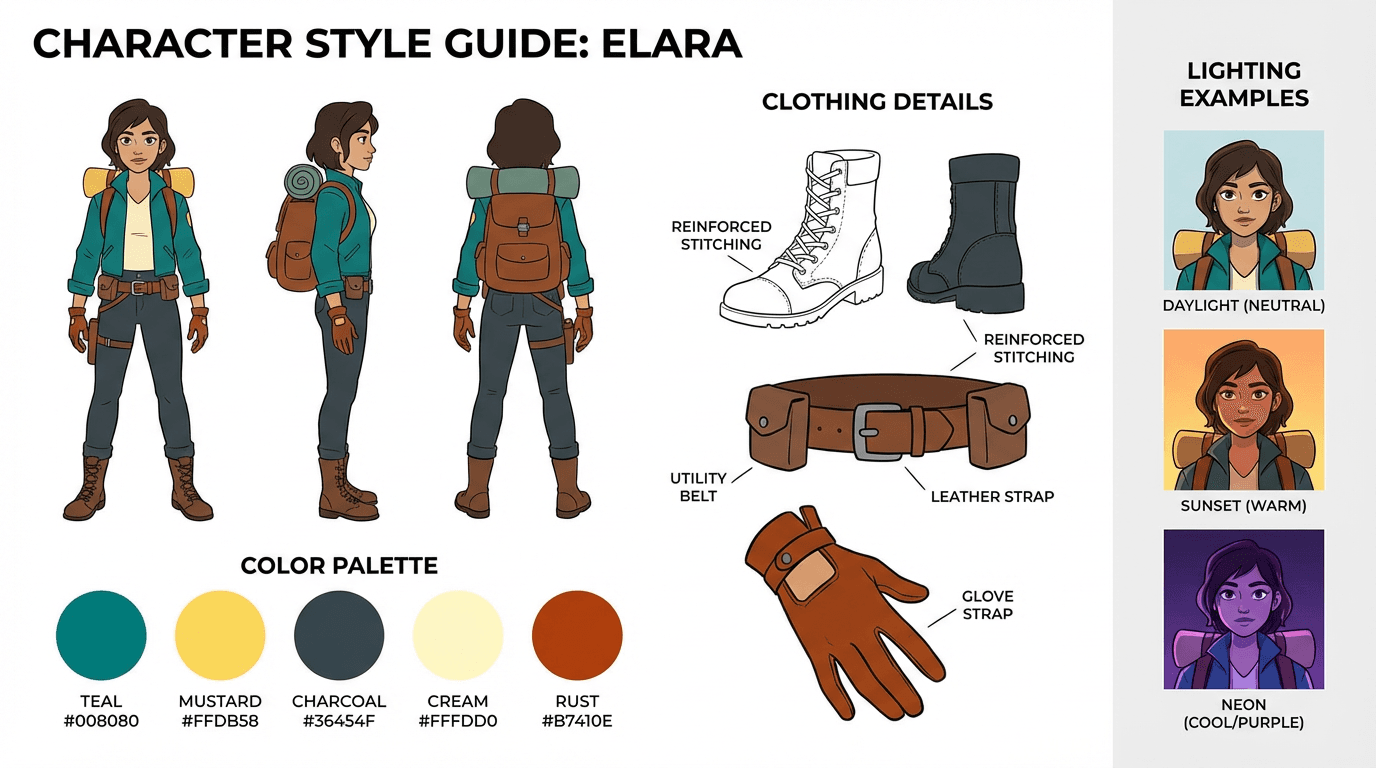
A visual style guide includes the character reference sheet (front, side, three-quarter views), three to five example images of the character in different scenes, a locked color palette for clothing and accessories, preferred lighting setups like "soft natural light" or "cinematic rim lighting," preferred camera angles and framing for different content types, and the exact text description block used in prompts.
Save all of this in a single document. When you or anyone on your team needs to generate a new image of the character, everything needed is in one place. No guessing, no rewording, no drift.
This approach is especially valuable for faceless YouTube channels that rely on illustrated or AI-generated characters as their visual identity. The character becomes the brand, and the style guide protects it.
Consistency Checklist Before Every Generation
Before clicking generate on any new character image, run through this quick checklist.
Is the character description block identical to the last generation? If you changed even one word, the output may drift. Is a reference image uploaded? Text alone produces more variation than text plus image. Is the art style keyword the same? Photorealistic, illustration, anime, or whatever you chose must stay consistent. Is the lighting setup similar? Dramatic shifts in lighting change how faces render. Are clothing and accessories fully described? Missing details get filled in randomly by the model. Is the camera angle appropriate? Extreme angle changes can distort facial features and proportions.
If all six are locked, your consistency rate will be significantly higher than prompting from memory.
Where to Practice Character Consistency for Free
The fastest way to build intuition around character consistency is to practice generating the same character in different scenarios and comparing the results side by side.
You can do this directly inside Miraflow AI's image generator, which supports reference image uploads alongside text prompts. Upload your character reference sheet, paste your locked description, change only the scene details, and generate. Compare outputs. Adjust what drifted. Regenerate. This iterative loop is how you train yourself to write prompts that hold consistency.
For YouTube creators, the thumbnail maker also supports reference image uploads, so you can generate thumbnails featuring your consistent character directly without switching tools.
The key is iteration. Every generation teaches you what holds and what drifts, and over time your prompts become tighter and your consistency rate improves.
Conclusion
Character consistency in AI-generated images is not about finding the perfect model or the perfect tool. It is about building a repeatable system. Define your character once. Save the description. Generate a reference sheet. Upload it every time. Lock your prompt structure. Use inpainting to fix drift instead of regenerating from scratch.
The creators who get the best results are not the ones writing the longest prompts. They are the ones who copy and paste the same character block into every generation and only change what needs to change. Consistency is a system, not a skill.
Start with one character. Build the reference sheet. Write five scene prompts. Generate them all and compare. That single exercise will teach you more about consistency than reading ten guides ever could.
Frequently Asked Questions
How do I keep my AI character looking the same in every image?
The most reliable method is to create a detailed character reference sheet that includes specific descriptions of facial features, body proportions, clothing, hair color and style, and accessories. Use this exact description as a fixed block in every prompt you generate. Tools like Midjourney's --cref parameter, DALL-E's memory feature, and Flux's IP-Adapter also help lock in visual identity across generations. The more specific and structured your prompt, the less the model will drift between images.
Why does my AI character look different every time I generate a new image?
AI image models generate each image independently, meaning they have no built-in memory of what your character looked like in a previous generation. Every new prompt is interpreted from scratch, so even small changes in wording, seed values, or scene context can cause the model to produce a visibly different version of the same character. This is why relying on a fixed character prompt block and reference images is essential for consistency.
What is the best AI tool for consistent characters in 2025-2026?
Midjourney v6 and above with the --cref (character reference) flag is currently one of the most reliable options for character consistency. Flux with IP-Adapter and LoRA training is the best open-source option for advanced users. DALL-E through ChatGPT Plus also introduced persistent character memory that works well for simpler use cases. For video content, tools like Kling, Hailuo, and Runway Gen-3 are improving character lock-in across frames.
Can I create a consistent AI character without training a custom model?
Yes. You do not need to train a LoRA or fine-tune any model to get consistent characters. Prompt-based approaches work well if you write a highly detailed character description and paste it into every generation. Combining this with character reference images using built-in features like Midjourney's --cref or copy-pasting a reference image into ChatGPT gives you strong consistency without any technical setup.
How do I write a character prompt that stays consistent across scenes?
Start by defining fixed attributes that never change: ethnicity, age range, eye color, hair color and length, face shape, build, and signature clothing or accessories. Write this as a single block of text and treat it as a template. Then for each new image, only change the scene description, pose, and lighting while keeping the character block identical. Avoid vague terms like "attractive woman" or "cool guy" because the model will interpret those differently every time.
Does using the same seed number help with character consistency?
Using the same seed helps reproduce similar compositions and color palettes, but it does not guarantee character consistency on its own. If you change the scene, pose, or any part of the prompt, the character can still shift even with an identical seed. Seeds work best as one layer of control combined with a fixed character description and reference images rather than as a standalone solution.
How do I make a consistent AI character for a YouTube channel or brand?
Start by generating multiple variations of your character and selecting the one that best fits your brand identity. Save that image as your master reference. Then build a character prompt template with every visual detail locked in. Use that reference image and prompt template for every thumbnail, scene, or Short you produce. If you are scaling content, consider training a LoRA on your chosen character design so the model reproduces it automatically with minimal prompt effort.
What is a character reference sheet and how do I make one for AI?
A character reference sheet is a single image or document that shows your character from multiple angles, with notes on key visual features like hair, clothing, colors, and proportions. You can create one by generating several consistent images of your character using AI, then compiling the best front-facing, side-profile, and full-body shots into one reference image. This sheet becomes your visual anchor that you feed back into the AI tool every time you generate a new scene.
How many reference images do I need for good character consistency?
For prompt-based workflows, one strong front-facing reference image is often enough. For LoRA training or IP-Adapter setups, you typically want between 10 and 20 high-quality images showing the character from different angles, in different lighting, and with varied expressions. The more diverse your training set, the better the model understands which features define the character versus which features are just scene-specific.
Can AI maintain character consistency in video, not just images?
Yes, but it is harder. AI video tools like Kling 2.0, Hailuo MiniMax, and Runway Gen-3 Alpha allow you to use a reference image as the starting frame, which helps maintain character appearance throughout a short clip. For longer videos or multi-scene content, most creators generate consistent images first and then animate each scene separately, editing them together in post-production to maintain visual continuity.